
To register for PM Surya Ghar Muft Bijli Yojana, visit pmsuryaghar.gov.in, verify your mobile number with OTP, complete your profile, then apply for Solar Rooftop by selecting your state, DISCOM, and consumer number. After DISCOM feasibility approval, select a vendor and submit bank details. Once the plant is installed and inspected by DISCOM, redeem the subsidy on the portal to receive up to ₹78,000 directly in your bank account.
This guide covers everything: PM surya ghar muft bijli yojana step by step registration, eligibility, subsidy and how to check your application status.
What Is PM Surya Ghar Muft Bijli Yojana?
This is the Government of India’s biggest residential rooftop solar scheme to date. The goal: install solar panels in 1 crore homes by March 2027.
Under the scheme, the government gives you a direct financial subsidy to cover a large part of the solar installation cost. Once the system is up and running, solar power generated on your rooftop meets your daily electricity needs. Any surplus power goes back to the grid through net metering, further reducing your bill.
The scheme is implemented through state electricity distribution companies (DISCOMs), and the central subsidy goes directly to your bank account, no middleman.
How to Register for PM Surya Ghar Muft Bijli Yojana Online
The full process has 6 steps as listed on the official portal. Keep scanned copies of your documents ready before you begin (Aadhaar card, latest electricity bill, proof of property ownership), you will need to upload them during the PM surya ghar muft bijli application.

Step 1: Register and Complete Your Profile
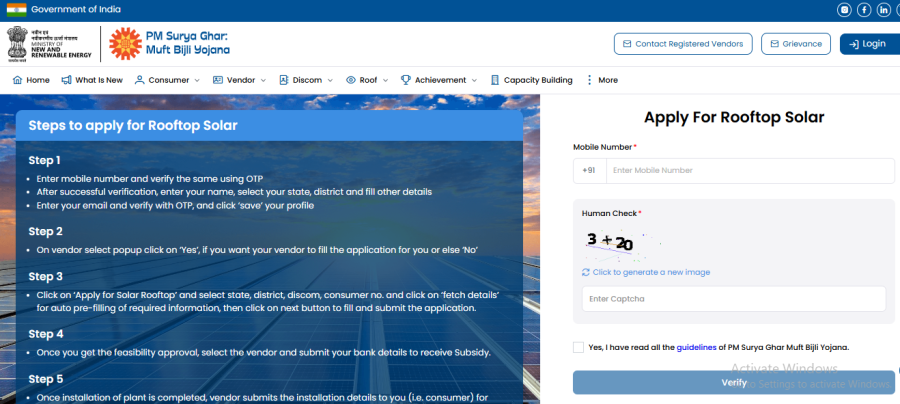
- Go to pmsuryaghar.gov.in and enter your mobile number
- Verify your mobile number using the OTP received
- After verification, enter your name, select your state and district, and fill in the other required details
- Enter your email address and verify it with another OTP
- Click “Save” to complete your profile
Step 2: Decide Whether Your Vendor Will Fill the Application
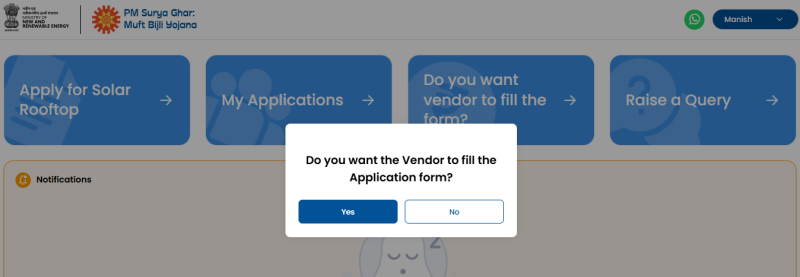
- A popup will appear asking whether you want your vendor to fill the application on your behalf
- Click “Yes” if you prefer your empanelled vendor to handle the form
- Click “No” if you want to fill and submit the application yourself
Step 3: Apply for Solar Rooftop
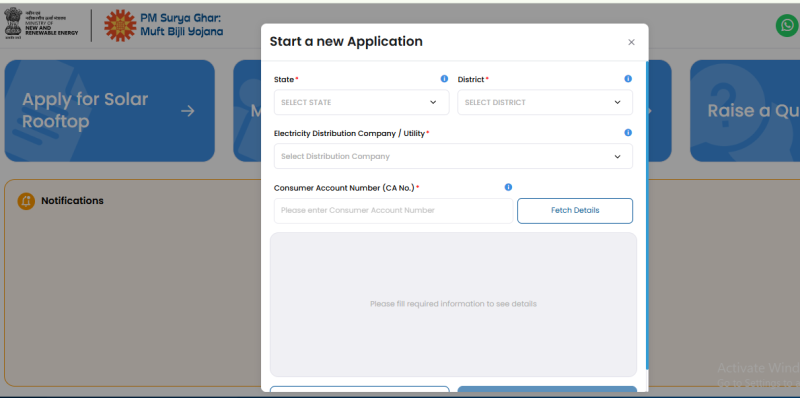
- Click on “Apply for Solar Rooftop”
- Select your state, district, DISCOM, and enter your consumer number
- Click “Fetch Details”: the portal auto fills your electricity connection information
- Click “Next” and complete the application form with all required details
- Submit the application
Step 4: Get Feasibility Approval, Select Vendor, and Submit Bank Details
- Wait for your DISCOM to review and grant feasibility approval for your rooftop
- Once approved, select your empanelled vendor from the portal
- Submit your bank account details: this is where the subsidy will be credited via Direct Benefit Transfer (DBT)
Step 5: Installation and Verification
- After the solar plant is installed, the vendor submits the installation details to you (the consumer) for your verification
- Once you verify, the vendor then submits the installation details to your DISCOM
Step 6: DISCOM Inspection and Subsidy Redemption
- Your DISCOM conducts a physical inspection of the installed plant and submits the inspection details to you
- After receiving the inspection confirmation, you redeem the subsidy through the portal
- The subsidy redemption request is submitted to NPIA (National Portal for Implementation of Agreements) for final processing and bank credit
Helpline: Call 15555 (toll-free) for any help at any stage of the process.
Eligibility
Before applying PM surya ghar scheme, check that you meet these conditions:
- Indian citizen: the property owner must be an Indian citizen
- Residential property ownership: you must own the house or have authorisation from the owner
- Valid electricity connection: a active DISCOM connection in the applicant’s name is mandatory
- Rooftop space: enough flat or angled rooftop area to install the solar system
- No existing rooftop solar: households that already have a subsidised rooftop solar system are not eligible for central financial assistance again
Note: There is no income limit mentioned in the central MNRE guidelines for the standard subsidy.
Read our guide on : New Electricity Connection: Apply Online
PM Surya Ghar Subsidy After Registration
The central government subsidy is based on the system size you install. Here are the official slab rates as per MNRE guidelines:
| System Size | Central Subsidy Amount |
|---|---|
| 1 kW | ₹30,000 |
| 2 kW | ₹60,000 |
| 3 kW and above | ₹78,000 (maximum cap) |
The subsidy formula is ₹30,000 per kW for the first 2 kW, and ₹18,000 per kW for the third kW. Beyond 3 kW, the central subsidy stays capped at ₹78,000.
For Group Housing Societies/RWAs: A subsidy of ₹18,000 per kW applies for common facilities, including EV charging, up to 500 kW total capacity.
State top-ups: Some states provide additional subsidies on top of the central amount. For example, Rajasthan provides an additional RREC top-up for eligible applicants. Check with your state DISCOM or state renewable energy department for current state-level benefits.
How you got subsidy: The subsidy is not deducted at source, you pay the vendor the full installation cost and the government transfers the subsidy directly to your bank account after the DISCOM verifies the commissioning report.
How to track your PM Surya Ghar Application?
- Go to pmsuryaghar.gov.in
- Click on “Login” or the consumer login section
- Enter your registered mobile number and verify with OTP
- The dashboard shows your current application stage, from DISCOM feasibility review to net meter approval and subsidy disbursement status
Conclusion
PM Surya Ghar Muft Bijli Yojana is one of the most direct and financially significant central government schemes running today. A subsidy of up to ₹78,000, plus virtually free electricity for 25 years of panel life, makes this worth applying for if you own a home.
The registration process is fully online, takes under 15 minutes, and requires only basic documents you already have. The key thing to do before you start: link your bank account to Aadhaar and keep your latest electricity bill handy.
Apply at pmsuryaghar.gov.in or call 15555 for any guidance.
FAQs:
You need your Aadhaar card, latest electricity bill, proof of property ownership, bank account details with IFSC, and a passport-size photograph.
Registration on the portal is free. You will pay the solar vendor for installation, after which the government subsidy is credited directly to your bank account.
Typically 30–45 days after DISCOM inspection and commissioning report submission
No. You must choose a vendor from the MNRE-empanelled vendor list available on the official portal.